
https://download.bell-sw.com/java/17.0.19+11/bellsoft-jdk17.0.19+11-windows-amd64.msi
Correct download link for the liberica
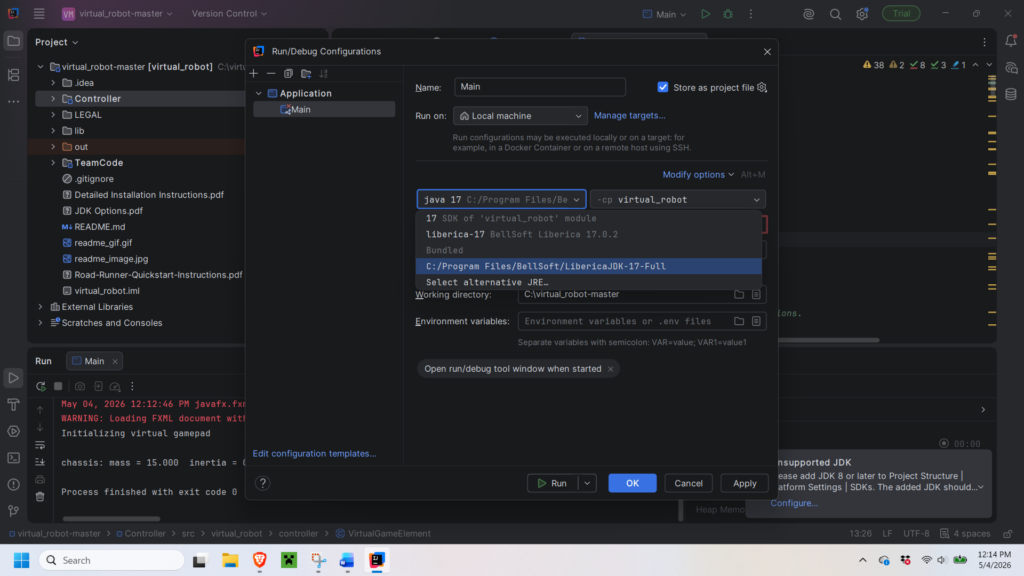
it already starts with a thing called main make sure you select the full version of liberica and select controller instead of virtual robot
←Back to Java Programming Learning Path
Step-by-step guide to run the FTC Virtual Robot emulator in Android Studio. No hardware required.
⚠ Known issue: A specific setup error has been documented separately. See the fix article if you run into it.
Before you begin: Complete all steps in order. Skipping the JDK step is the #1 cause of setup failures.
1 Install the Liberica JDK 17 Full
Critical — Full version required. The emulator uses JavaFX, which is only included in the Full JDK. Standard JDK, Oracle JDK, and Amazon Corretto will not work.
- Go to bell-sw.com/pages/downloads
- Select Version 17, Full JDK, and your OS (Windows or Mac)
- Download and run the installer — accept all defaults
2 Install Android Studio
- Go to developer.android.com/studio
- Download and install with all defaults
- When the Setup Wizard runs on first launch, let it complete fully — it downloads the Android SDK automatically
- Click Next through all component prompts and wait for the install to finish before continuing
3 Clone the Repository
- From the Android Studio Welcome screen, click Get from VCS
- Make sure Git is selected on the left
- Paste this URL into the URL field:
https://github.com/ARES-23247/virtual_robot.git
- Leave the Directory field as the default, or choose your preferred location
- Click Clone
- If prompted “Trust this project?” — click Trust Project
- Wait for Gradle to finish syncing — this can take several minutes the first time
4 Point Android Studio to Liberica JDK
Required. Android Studio uses its own bundled JDK by default. You must switch it to Liberica 17 Full or the emulator will crash on launch.
- Go to File → Project Structure
Windows shortcut:Ctrl+Alt+Shift+S| Mac shortcut:Cmd+; - Click SDK Location on the left panel
- Under JDK location, click the dropdown → Add JDK…
- Navigate to the Liberica install folder:
Windows:C:\Program Files\BellSoft\LibericaJDK-17-Full
Mac:/Library/Java/JavaVirtualMachines/liberica-jdk-17-full.jdk/Contents/Home - Click OK — confirm the JDK location now shows the Liberica path
- Click Apply → OK
5 Set the Run Configuration
- Click the dropdown at the top toolbar — it may say app or No Configurations
- Click Edit Configurations…
- Click the + button → select Application
- Fill in these three fields:
| Field | Value |
|---|---|
| Name | Main |
| Module | virtual_robot — not Controller or TeamCode |
| Main class | virtual_robot.main.Main |
- Click OK
6 Run the Emulator
- Click Build → Rebuild Project and wait for it to finish with no errors
- Click the green Run ▶ button, or press
Shift+F10 - The Virtual Robot window opens on your screen
- In the Configurations dropdown — select Programming Board
- In the OpModes dropdown — select any available OpMode
- Click INIT then START
✔ Setup complete — if the emulator window opens and the Programming Board is visible, everything is working correctly.
7 Where Students Write Their Code
Students only ever work inside the TeamCode module. Never touch Controller/ or virtual_robot/.
virtual_robot/ ← DO NOT TOUCH
Controller/ ← DO NOT TOUCH
TeamCode/ ← STUDENTS WORK HERE ONLY
src/
org/firstinspires/ftc/
teamcode/ ← ALL OpModes go here
mechanisms/ ← ProgrammingBoard1.java goes here
Controller/ ← DO NOT TOUCH
TeamCode/ ← STUDENTS WORK HERE ONLY
src/
org/firstinspires/ftc/
teamcode/ ← ALL OpModes go here
mechanisms/ ← ProgrammingBoard1.java goes here
8 Creating a New OpMode
- In the Project panel, expand TeamCode → src → org → firstinspires → ftc → teamcode
- Right-click the
teamcodefolder → New → Java Class - Name your class (e.g.
LJCh06) - Add
@TeleOp(name="...")directly above the class declaration - Add
extends OpModeto the class declaration - Click Build → Rebuild Project
- Your new OpMode now appears in the emulator’s OpModes dropdown
Creating the mechanisms package: Right-click
teamcode → New → Package → type mechanisms. Then right-click mechanisms → New → Java Class → name it ProgrammingBoard1.
! Troubleshooting
⚠ Known issue: If you hit a specific error during setup, see the fix article.
| Problem | Likely Cause | Fix |
|---|---|---|
| App crashes on launch | Wrong JDK installed | Redo Step 4 — must use Liberica JDK 17 Full |
| Gradle sync fails | Android SDK not installed | Let the Android Studio Setup Wizard complete fully |
| OpMode not in dropdown | Project not rebuilt after changes | Build → Rebuild Project |
NullPointerException on INIT | Wrong hardware device name | Names must match exactly: "motor" "servo" "touch_sensor" "pot" "sensor_color_distance" "imu" |
| Run button grayed out | No run configuration set | Redo Step 5 |
| OpMode missing from list | Missing @TeleOp annotation | Add @TeleOp(name="YourName") directly above the class declaration |